
How to use worked examples in a lesson
By the Workshopy teamPublished 7 min read
A worked example is a problem solved in front of the learner, every step shown. For beginners it teaches faster than a blank exercise. Use it in three moves: show one complete solution and ask students to explain a step of it, give the same kind of problem with one step left out, then a problem with no help at all. Stop showing as soon as students solve them on their own, because for those who already can, more examples slow them down.
What a worked example is, and why it works
A worked example has three parts: the problem, each step of the solution, and the result. "Here is a SQL query, here is what each line does, here is the table it returns." It is not a demonstration students half-watch; it is something they study, line by line.
It works because of where beginners spend their effort. A novice facing a blank problem has no plan, so they search: try something, look, try something else. That search fills their working memory, and little is left for noticing why the solution works. Richard Clark, Paul Kirschner and John Sweller call the result the worked-example effect: novices who learn by solving problems do worse on later tests, including different problems, than novices who studied equivalent worked examples. It was first shown in the 1980s with algebra students, and has been repeated since in subjects from science to English literature and history.
The same review adds the condition that matters most. The effect is for novices. As learners gain expertise it first disappears and then reverses: for someone who can already solve the problem, studying a worked example is extra reading that gets in the way. That is called the expertise reversal effect, and it decides when you stop.
Step 1: show one complete example
Pick a problem that uses exactly the idea you are teaching, and nothing else new. Then write out every step, including the ones that feel too obvious to write. Those are the steps beginners miss.
For a first CSS rule:
h1 { color: seagreen; }h1picks what to style: every main heading.colornames what to change: the text colour.seagreenis the new value.
Three things make an example easier to learn from:
- Name the steps. "Picks, names, is" are labels a student can reuse on the next rule. Greg Wilson's Teaching Tech Together calls these labelled subgoals, and cites research where learners given them did better on Parsons problems, which ask them to put given lines of code in the right order.
- Keep the explanation next to the line it explains. A note three paragraphs below the code makes students look back and forth, which costs the attention the example was meant to save.
- Show the result. The page with the green heading, the table the query returned, the number at the end. Without it, the example is a recipe with no picture of the dish.
Make students explain it, not just read it
The weak point of worked examples is that reading feels like learning. A student scrolls past a solution, nods, and has learned almost nothing. MIT's Teaching + Learning Lab lists passive reading as the first way the benefit is lost, and notes that students rarely explain examples to themselves unless asked.
So ask. Under the example, put one question that makes them use it:
- "Which part would you change to style a paragraph instead?"
- "Why does this query need
GROUP BY?" - "What would this print if the list were empty?"
In the room, ask two students to answer out loud before anyone types. A question with a clear answer works better than "any questions?", which beginners rarely answer.
Two more ways to make students work on an example: show two solutions to the same problem and ask what is different, or show a solution with one mistake in it and ask where it is.
Step 2: give the same problem with a gap
The jump from a complete example straight to "now you try" is where many lessons lose half the room. Fill it with a faded example: the same kind of problem, with one step of the solution left out.
p { ____: navy; }Alexander Renkl, Robert Atkinson and Uwe Maier tested this in 2000. Instead of pairing each example with one problem to solve, they showed a complete example, then the next with one step left out, then two, until only the problem was left. In a ninth-grade physics class and again in a lab study with university students, the fading group did better on problems like the ones they practised, and made fewer errors while learning. In their first study they removed the last step first, then the last two; that order is called backward fading.
Their study also found a limit worth knowing. Fading helped on similar problems, not on problems with a different structure. For that, the explaining in the section above matters more. Use both: fade the steps, and keep asking why each step is there.
For a longer procedure, fade one step per problem:
- All five steps shown.
- Steps 1 to 4 shown, step 5 for the student.
- Steps 1 to 3 shown, steps 4 and 5 for the student.
- The problem alone.
Step 3: a problem with no example
Then give a problem close to the examples, but not the same: "Make the links on your page orange." No example on screen. This is where you learn whether the idea arrived.
Give the student a way to know if they got it right, right away: what the page should look like, what the command should print, the number at the end. A beginner who finishes an independent problem without feedback carries their mistake into the next three.
Watch what the room gets wrong here. If most students make the same mistake, go back to step 2 with a different gap rather than showing a third complete example. If almost everyone gets it right, move on.
When to stop showing examples
The expertise reversal effect gives you the rule: examples are for the start of a new idea, and you fade them as students show they can do it. Practical signals:
- They solve the independent problem first time. Stop giving complete examples of this idea.
- They skip the example and go straight to the task. Often they are right; let them, and check their result.
- The class is mixed. Put the example and the problem in the same step. Beginners study the example first; those who already know it go straight to the problem. Teaching adults in a hands-on workshop covers mixed rooms in more detail.
Don't ask students whether they need the example. Ask them to solve a problem, and let the result decide.
Worked examples in a Workshopy lesson
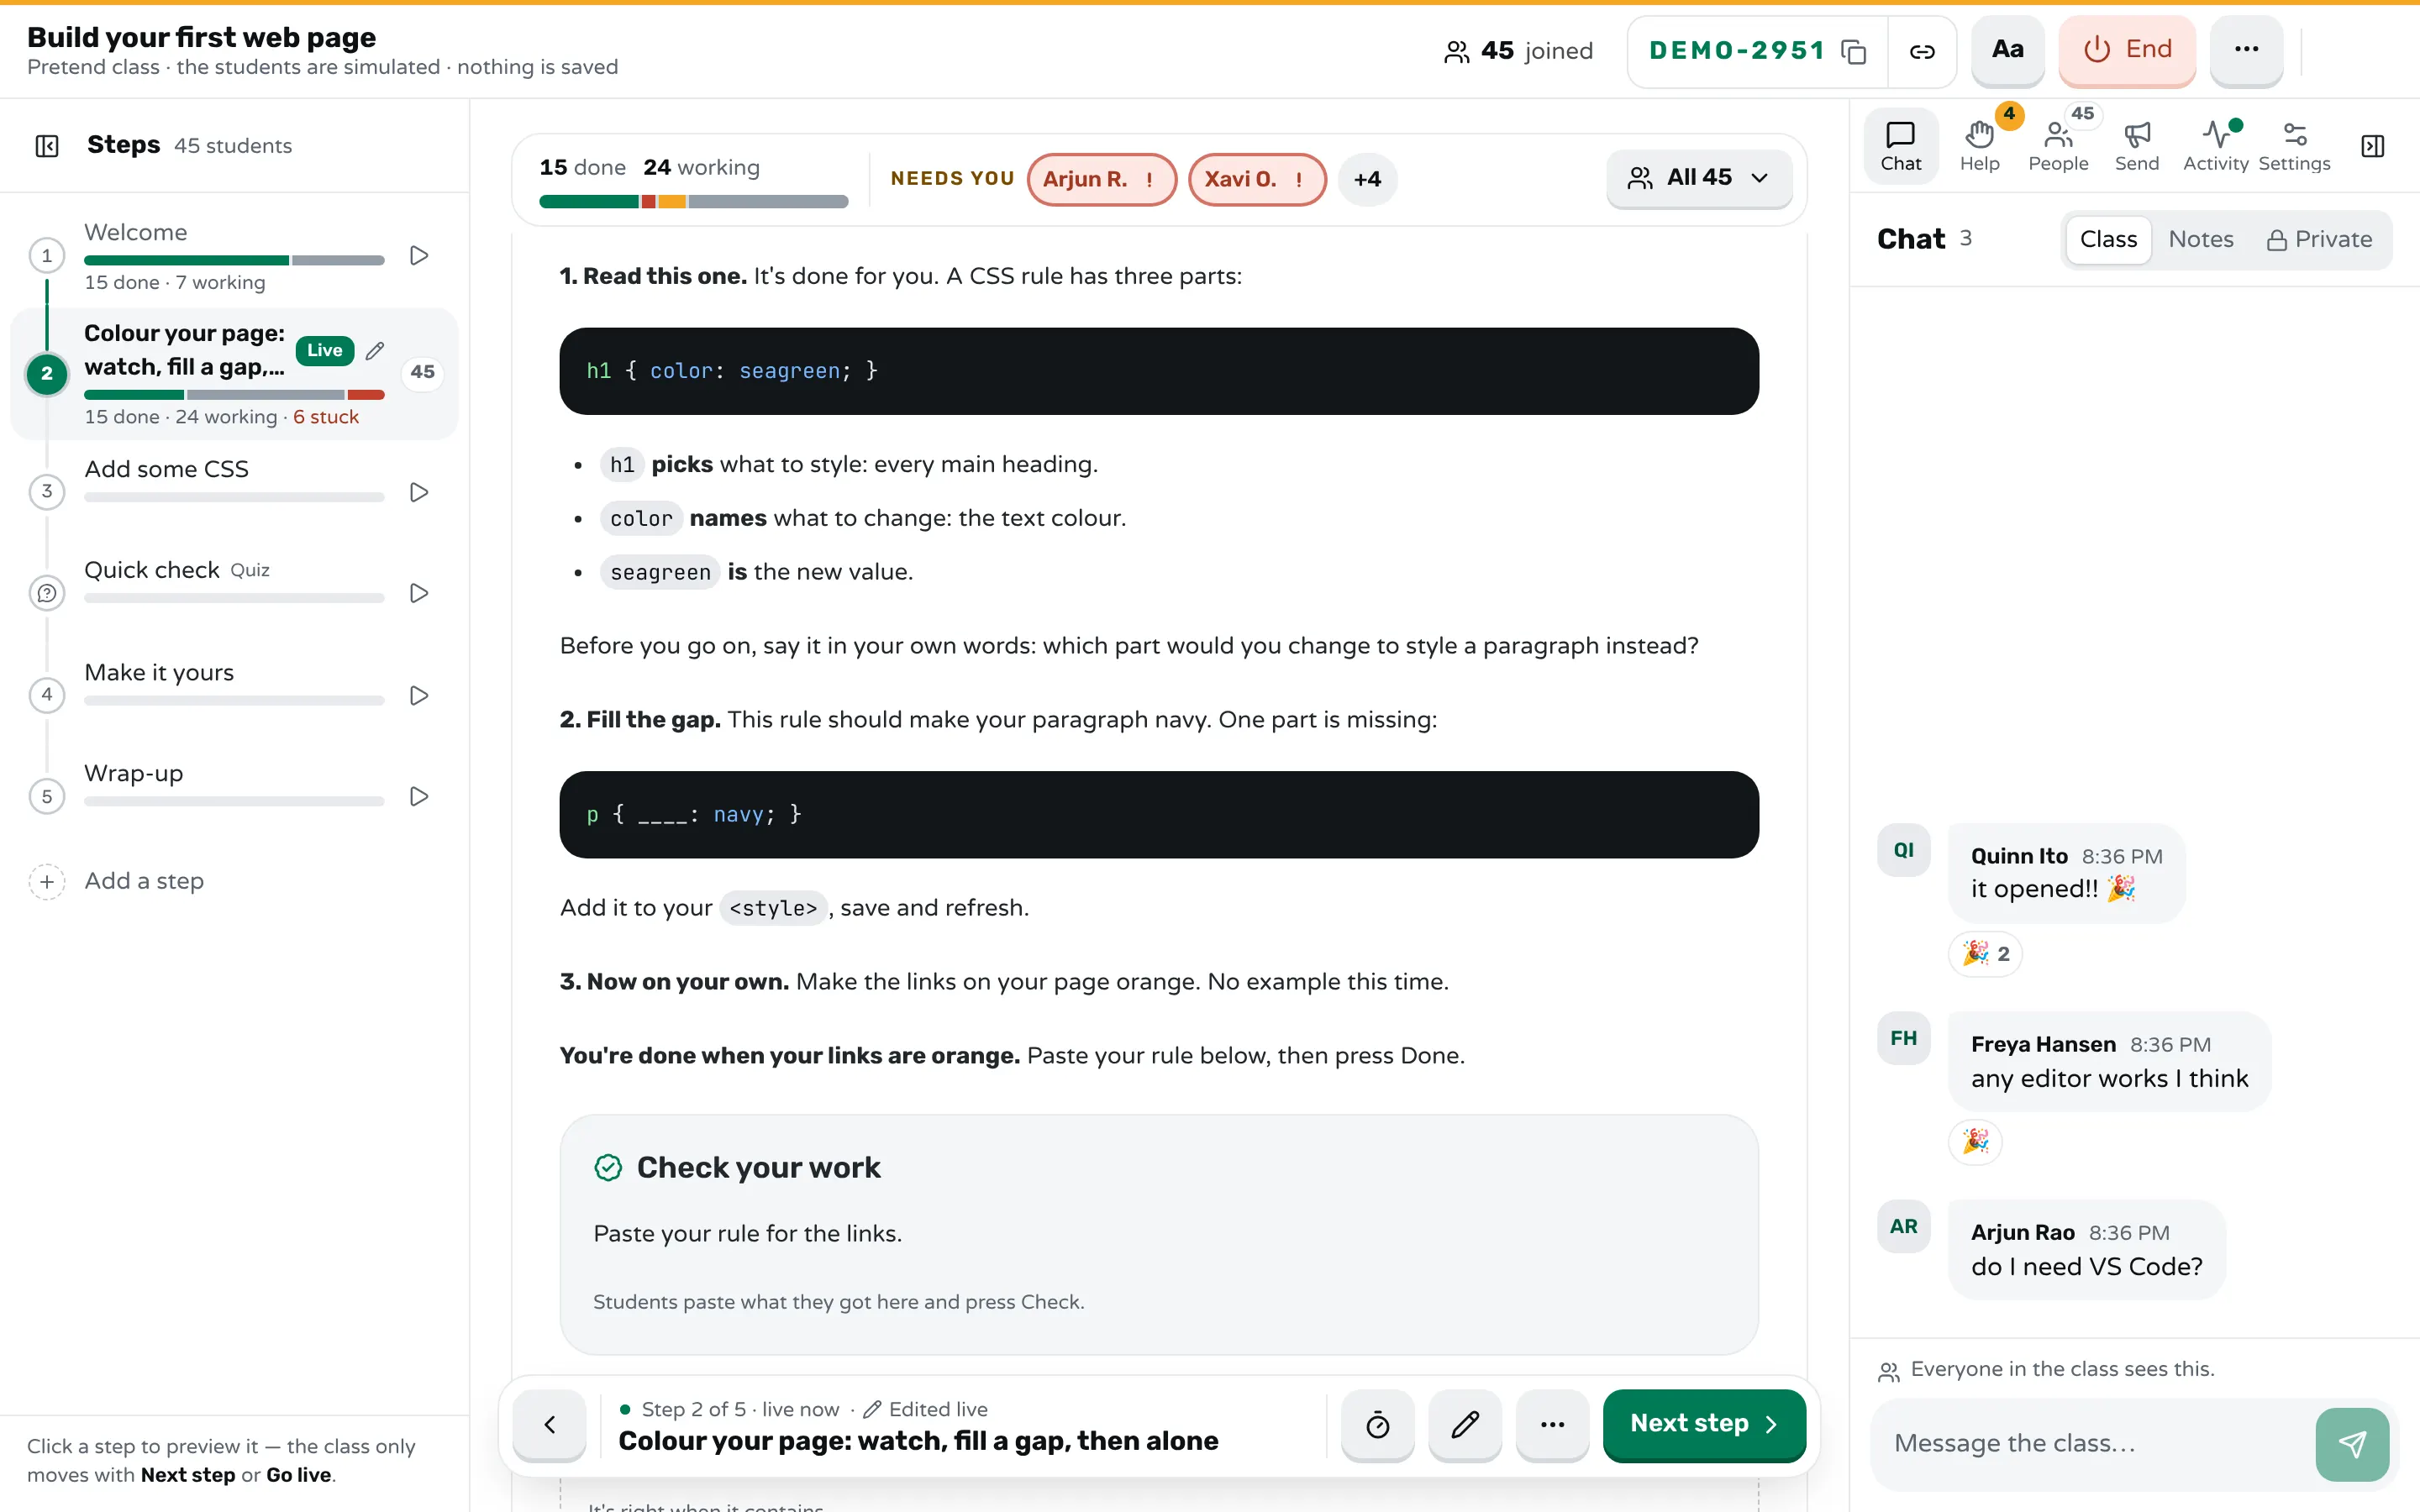
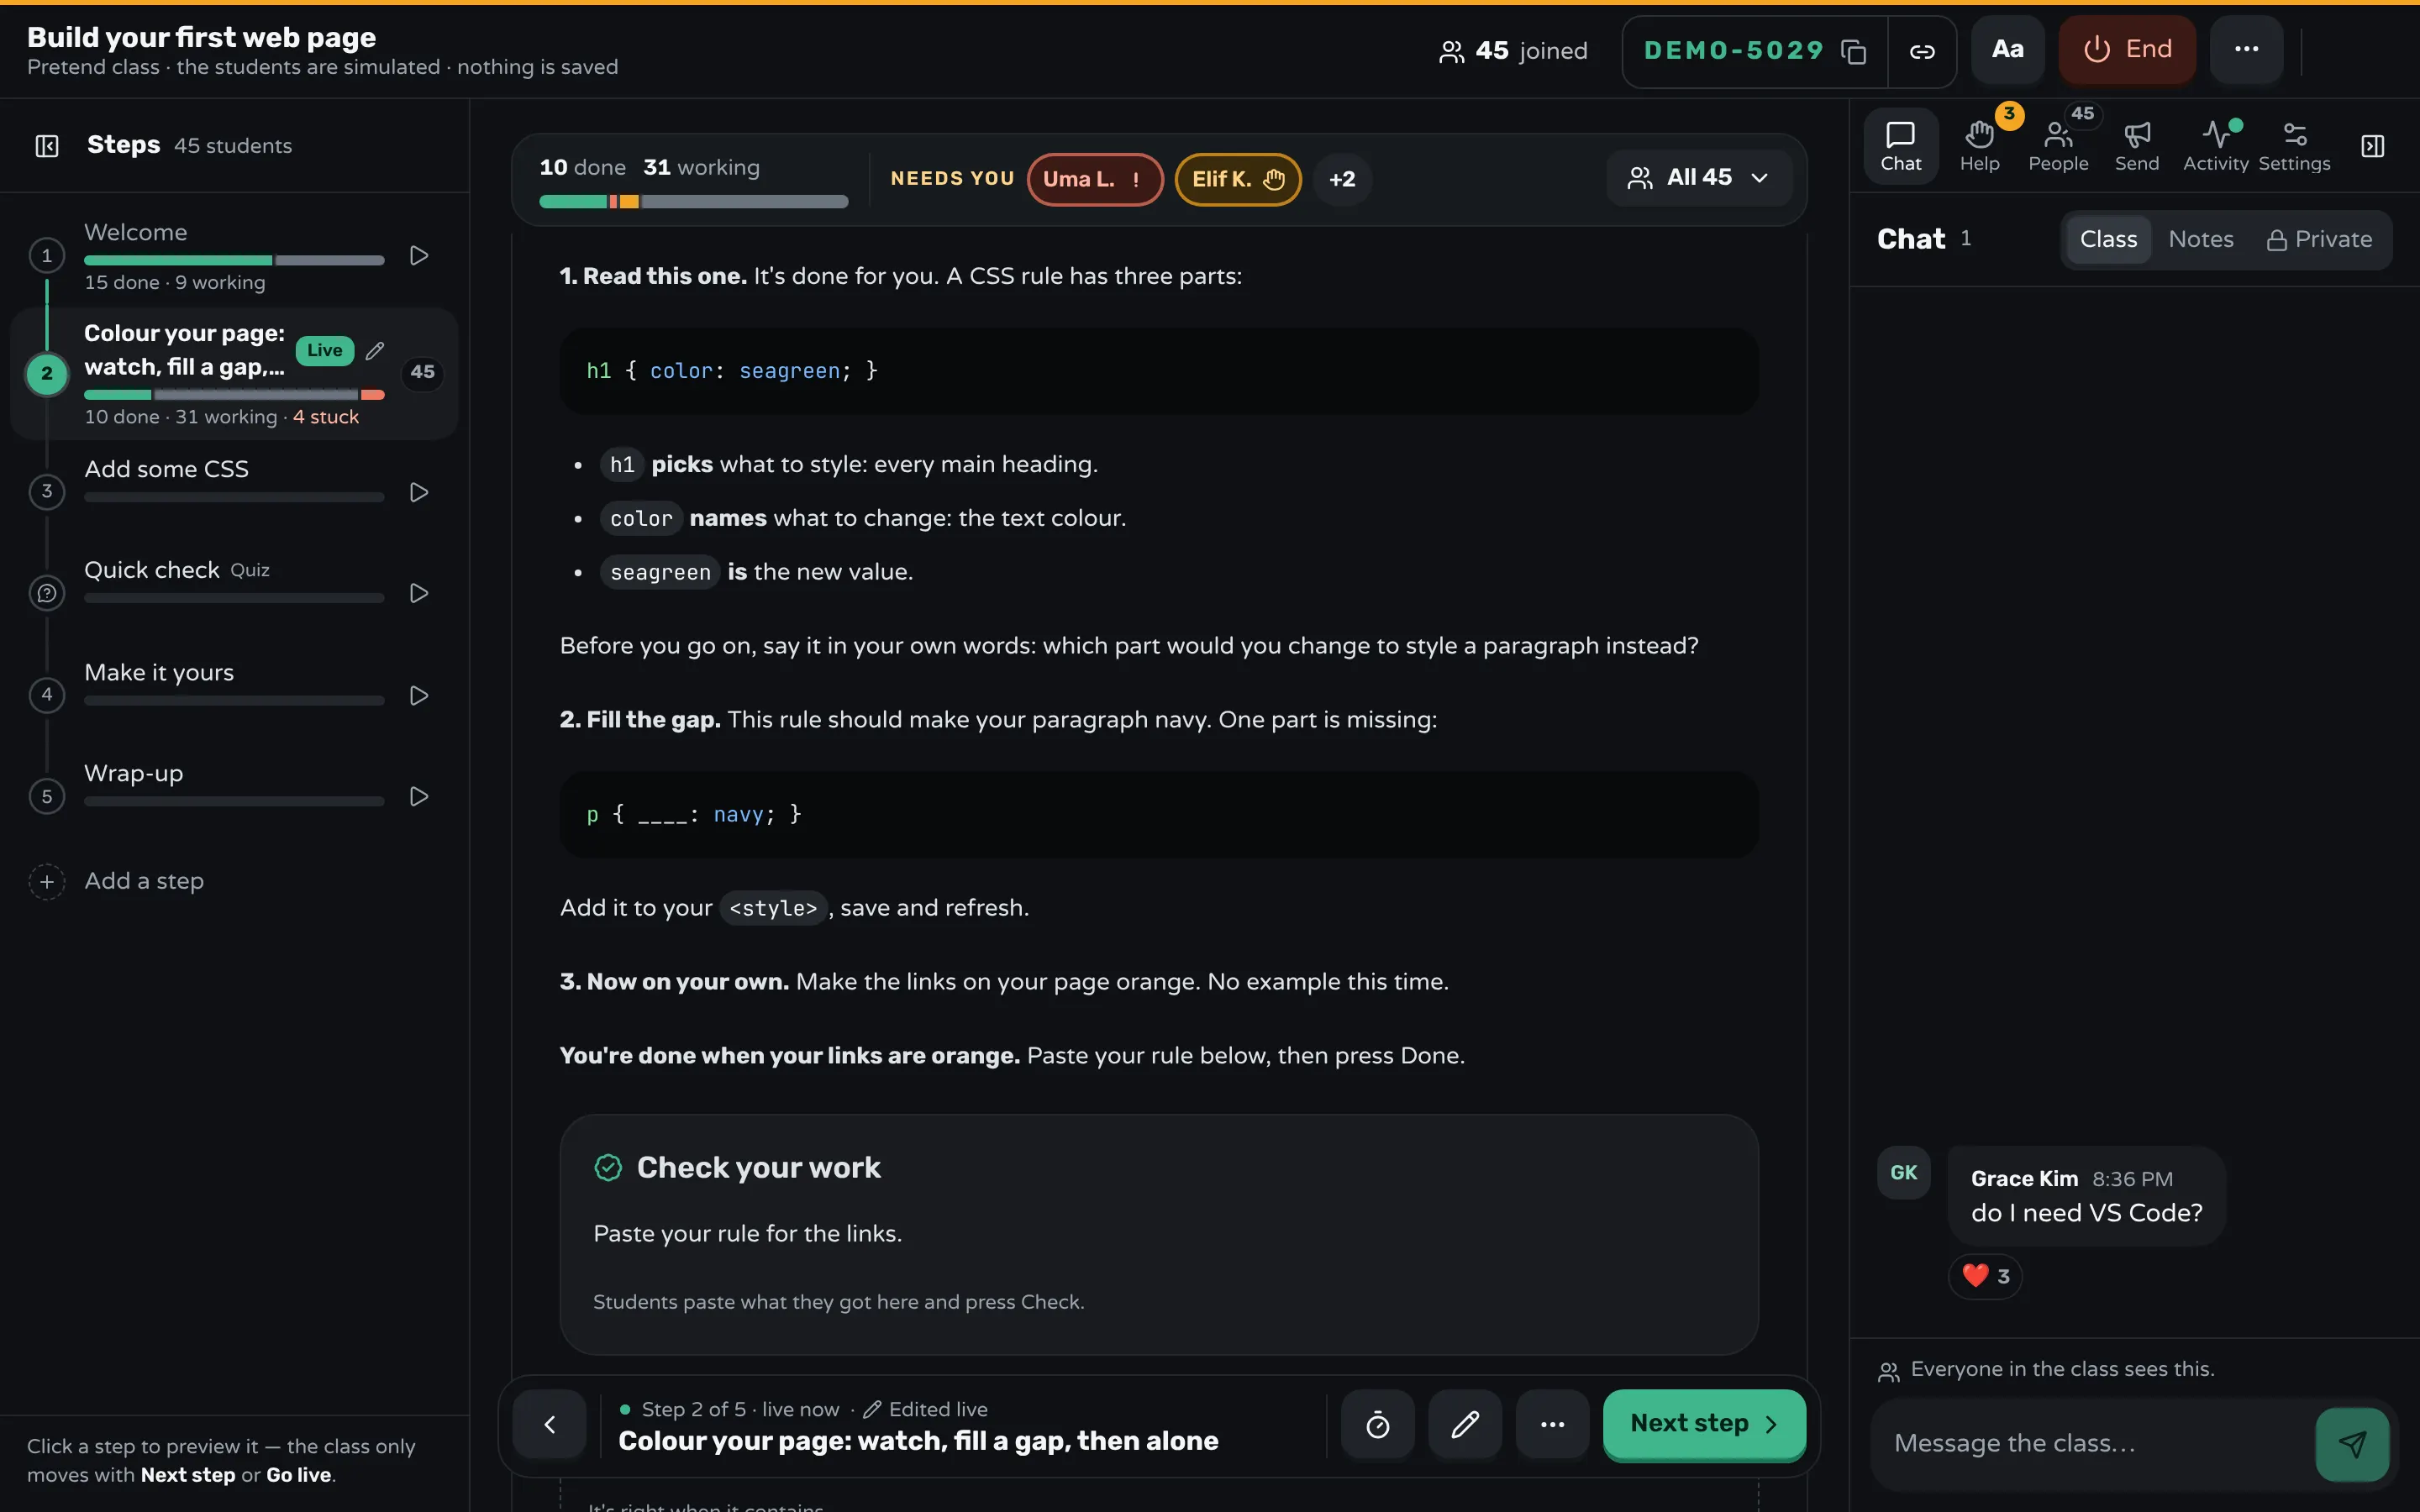
In Workshopy a lesson is a Markdown document, and each step is one heading. A faded example fits in one step: part 1 complete, part 2 with a gap, part 3 alone, ending with a check. Students see the step on their own screens and work through it at their own pace, and you see the class's progress step by step. Breaking a lesson into small steps covers how big each step should be.
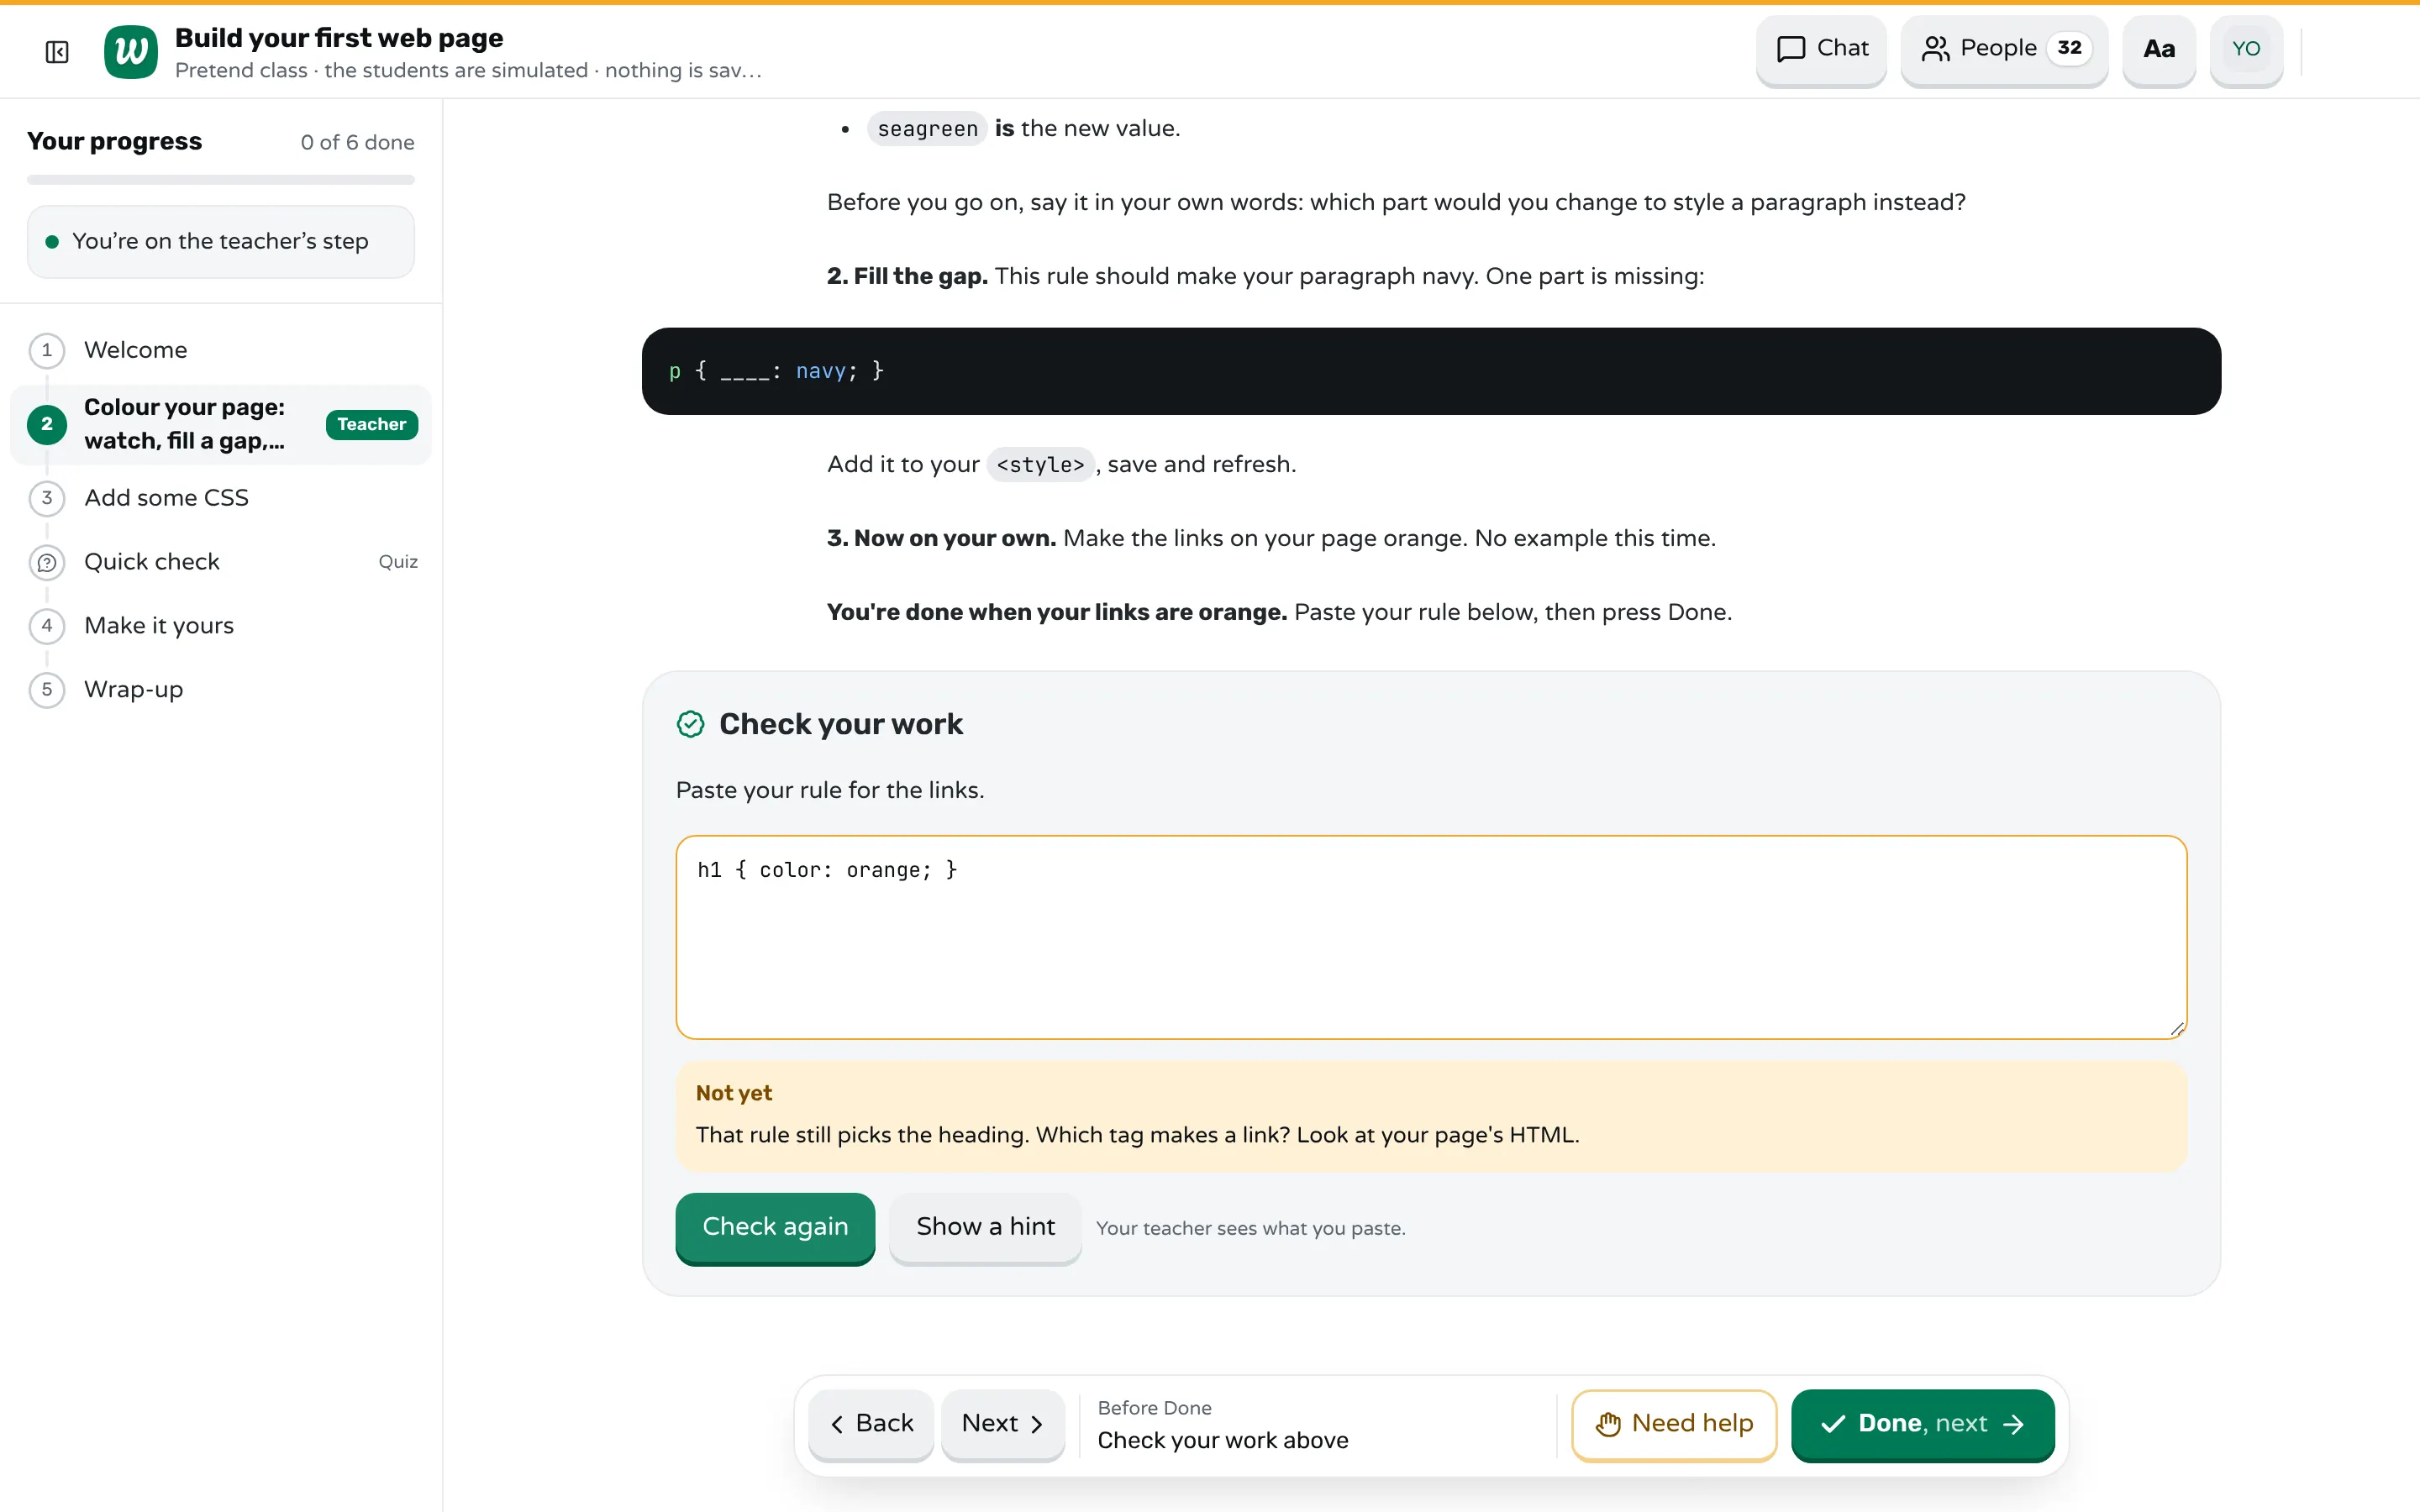
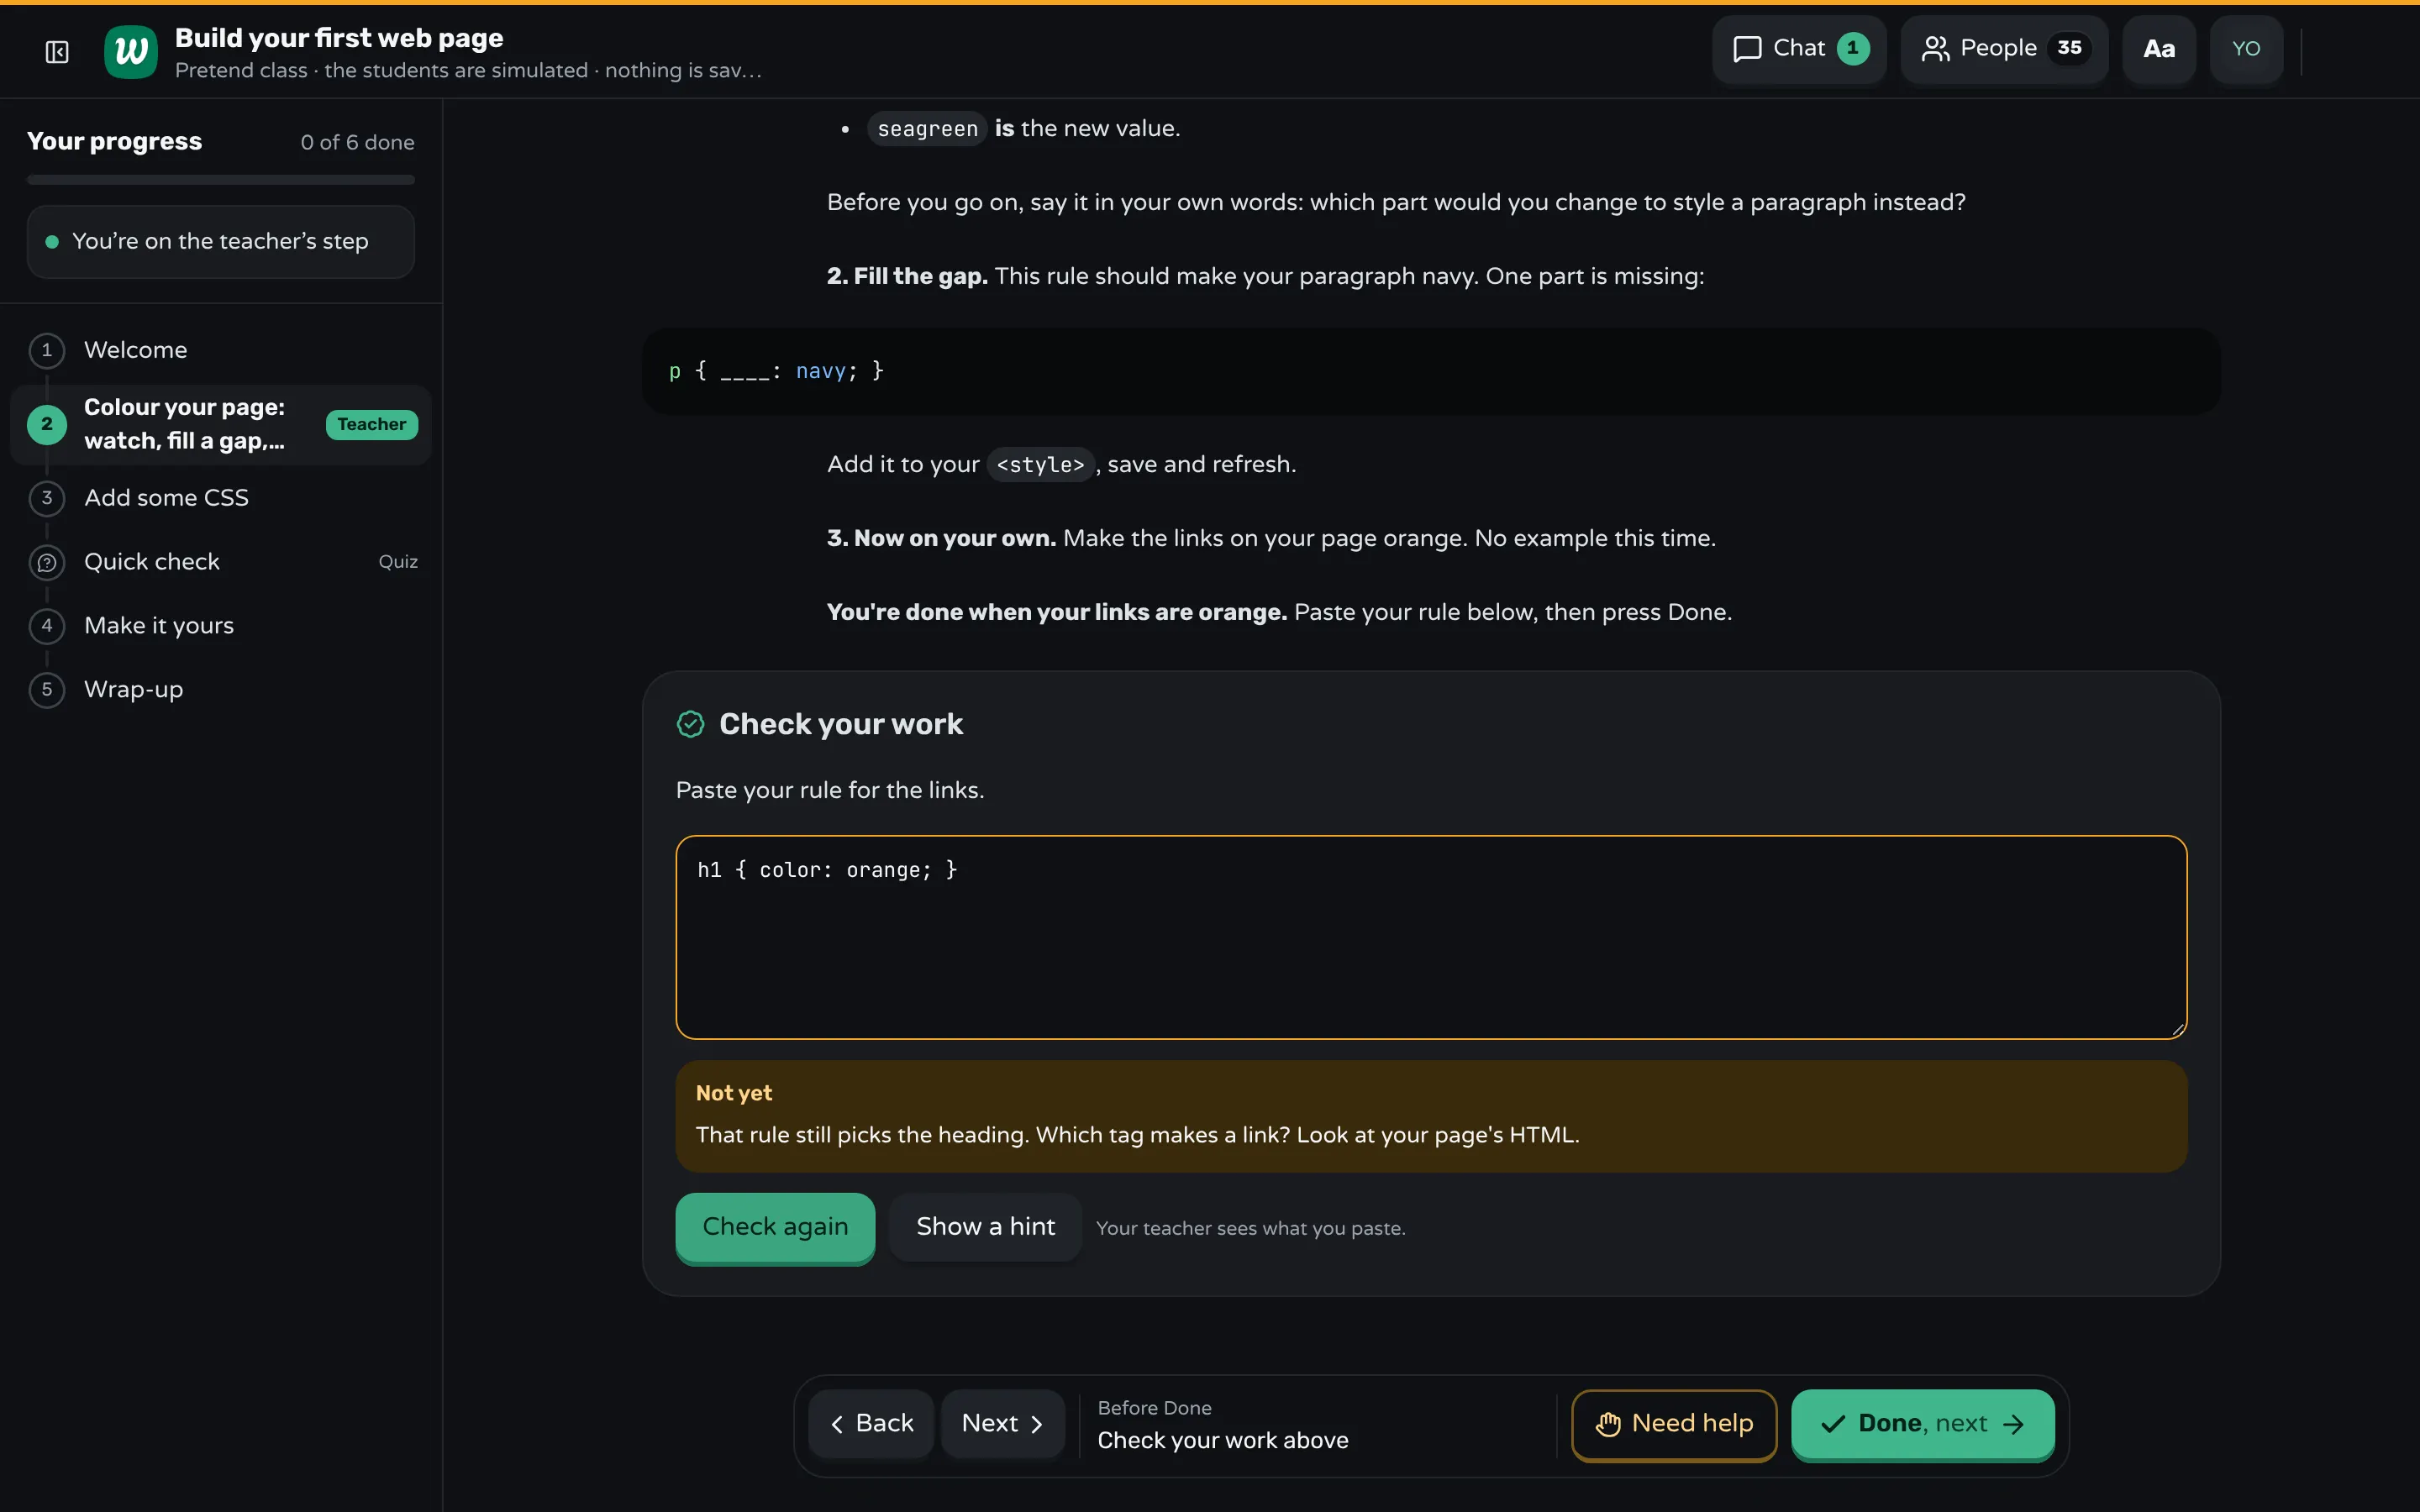
The check. End the step with a ```check block. A student pastes their rule, and the server checks it against your key. For each mistake you expect, write a mistake: line with what you would say, and the student gets your words the moment they paste it:
```check
Paste your rule for the links.

contains: a {
contains: color: orange

mistake: h1 → That rule still picks the heading. Which tag makes a link? Look at your page's HTML.
mistake: colour → Close. CSS only knows the American spelling, color.
hint: Start from the rule in part 1 and change two parts: what it picks, and the value.
```
On your screen, the same check shows how many students passed and groups the wrong pastes, so you see whether the room needs another gap before you move on. A ```teacher block in the step holds your own notes, such as which two students to ask about part 1; students never see it.
Examples after an attempt. A practice step (#[practice]) holds exercises students answer and check, each with a hint and a ### Solution. By default the solution opens after a right answer or two tries, so the worked example arrives when the student has tried the problem first. Turn on Solutions wait for me in the class's settings to keep solutions closed, and press Show solution to everyone on the exercise when you decide the room needs it. Your screen shows each student's exercises as a grid, solved or still trying.
Sources
- Richard E. Clark, Paul A. Kirschner and John Sweller, Putting Students on the Path to Learning: The Case for Fully Guided Instruction, American Educator (2012)
- Alexander Renkl, Robert K. Atkinson and Uwe H. Maier, From Studying Examples to Solving Problems: Fading Worked-Out Solution Steps Helps Learning (2000)
- Greg Wilson, Teaching Tech Together, "Faded Examples" and "Labeled Subgoals" (2019)
- MIT Teaching + Learning Lab, Worked Examples
Frequently asked questions
What is a worked example in teaching?
A problem solved step by step in front of the learner: the problem, each step with what it does, and the result. Students study it before they solve a similar problem themselves.
What is a faded worked example?
A worked example with one or more steps left for the student to complete. A series starts with a complete example and removes one step at a time until only the problem is left.
Are worked examples better than problem solving?
For beginners learning a new idea, yes: they learn more from studying worked examples than from solving the same problems alone. For learners who can already solve the problem, solving it is better.
How many worked examples should I show?
Usually one complete example, then one or two with gaps, then a problem alone. Add another gapped example only if many students get the independent problem wrong.
Do worked examples work outside maths and coding?
Yes. Researchers have found the effect in science, English literature, history and art. An annotated essay paragraph or a marked-up lab report is a worked example too.
Keep reading
How to break a lesson into small steps
List what students must be able to do, give each skill a step with one new idea, and end every step with a result students can check.
8 min read · 2 Nov 2026
Build lessonsHow to make a lesson students can take on their own
Write steps that stand alone, end each with a check that answers back, say what to do when stuck, and give the lesson a clear finish.
8 min read · 12 Nov 2026
Hands-on & coding workshopsHow to teach adults in a hands-on workshop
Start with something useful the same day, match the help to what each person knows, keep mistakes private, and never call anything "just".
5 min read · 21 Oct 2026
Ready-made lessons from the library
Intro to Git — Snapshots, Branches & Sharing
A short, hands-on first lesson in Git for complete beginners. Students build the mental model one idea at a time — snapshots, the three areas…
10 steps · Free
Teacher trainingMeet Workshopy — A Live, Interactive Product Tour
A live, interactive product tour of Workshopy for new users. It runs as a real Workshopy session, so the audience experiences the product as participants while…
16 steps · Free
Teacher trainingTrain the Trainer: How to Design a Hands-On Workshop
A train the trainer workshop on designing hands-on sessions: write objectives you can see, plan an hour of talks, exercises and checks, find who's stuck.
11 steps · Free
Learn any of them on your own, free, or copy one and teach it live. Browse the library
See it with a class of 24. No sign-up.
The live demo runs the real product with a simulated class. When you're ready, start free.