
How to make a lesson students can take on their own
By the Workshopy teamPublished 8 min read
A lesson students take on their own has to do the three jobs you do in the room: show how, tell them whether they got it, and help when they are stuck. Write every step so it makes sense without you, end each one with a check that answers back right away, and write down the help you would give out loud: the usual mistakes, a hint, the worked solution. Then give the lesson a visible path and an end, and test it on one person before you share it.
What goes missing when you leave the room
In a live class you do far more than present. You show the step once, watch faces, notice the student who typed the command at the wrong prompt, and say "look at line 3". You decide when the room moves on. Most of that is invisible until you take it away.
Remove it and the same lesson fails in predictable ways. Students skip the example because nobody is pointing at it. They finish a step without knowing whether it worked, and carry the mistake into the next three. They get stuck on something small, find no one to ask, and close the tab. The lesson did not get harder. It lost its feedback.
David Merrill compared the main instructional design theories in 2002 and found the same few principles in all of them: learning is promoted when new knowledge is demonstrated to the learner, and when learners apply it, with feedback and coaching that are gradually withdrawn. A self-paced lesson keeps all three. The demonstration moves into the step, the application into its task, and the coaching into what the step says back.
Show it before you ask for it
The most common self-paced lesson is a page of explanation followed by "now try it yourself". For beginners that is the weakest design there is. Richard Clark, Paul Kirschner and John Sweller summarise decades of studies: novices learn more from studying worked examples than from solving the same problems unaided, and for novices fully guided instruction beats discovery.
So every step that asks students to do something first shows it done:
- One worked example, complete, with the result it gives. For a SQL step: the query, and the table it returns. Using worked examples in a lesson covers how to write one and when to stop.
- Then the task, close to the example but not the same. "Now count the customers in Haifa." Not a new idea, the same idea once more.
- One new idea per step. If a step needs two explanations, it is two steps. Breaking a lesson into small steps covers how to cut it.
Write the step as if the student will read nothing else, because they won't. Name files, buttons and menus exactly as they appear. Say where to type. If a step depends on something from two steps back, repeat it in one line rather than assume it was read.
End every step with a check that answers back
In the room, "does yours look like mine?" takes a glance. On their own, students need a way to know, before they move on, that the step worked. Give every step a result they can check:
- Something to see: "Your page now shows a green heading."
- Something to compare: "The query returns 12 rows."
- A question with an answer: "How many pixels of space does
margin: 40pxleave on the left?"
The check only teaches if it answers back. Valerie Shute's 2008 review of the research on formative feedback gives the rules: feedback should say what, how and why, not only "right" or "wrong"; it should be specific and short, given in small pieces; and it should come after the learner has tried, never before. A self-paced lesson can follow all of them, because you write the feedback in advance:
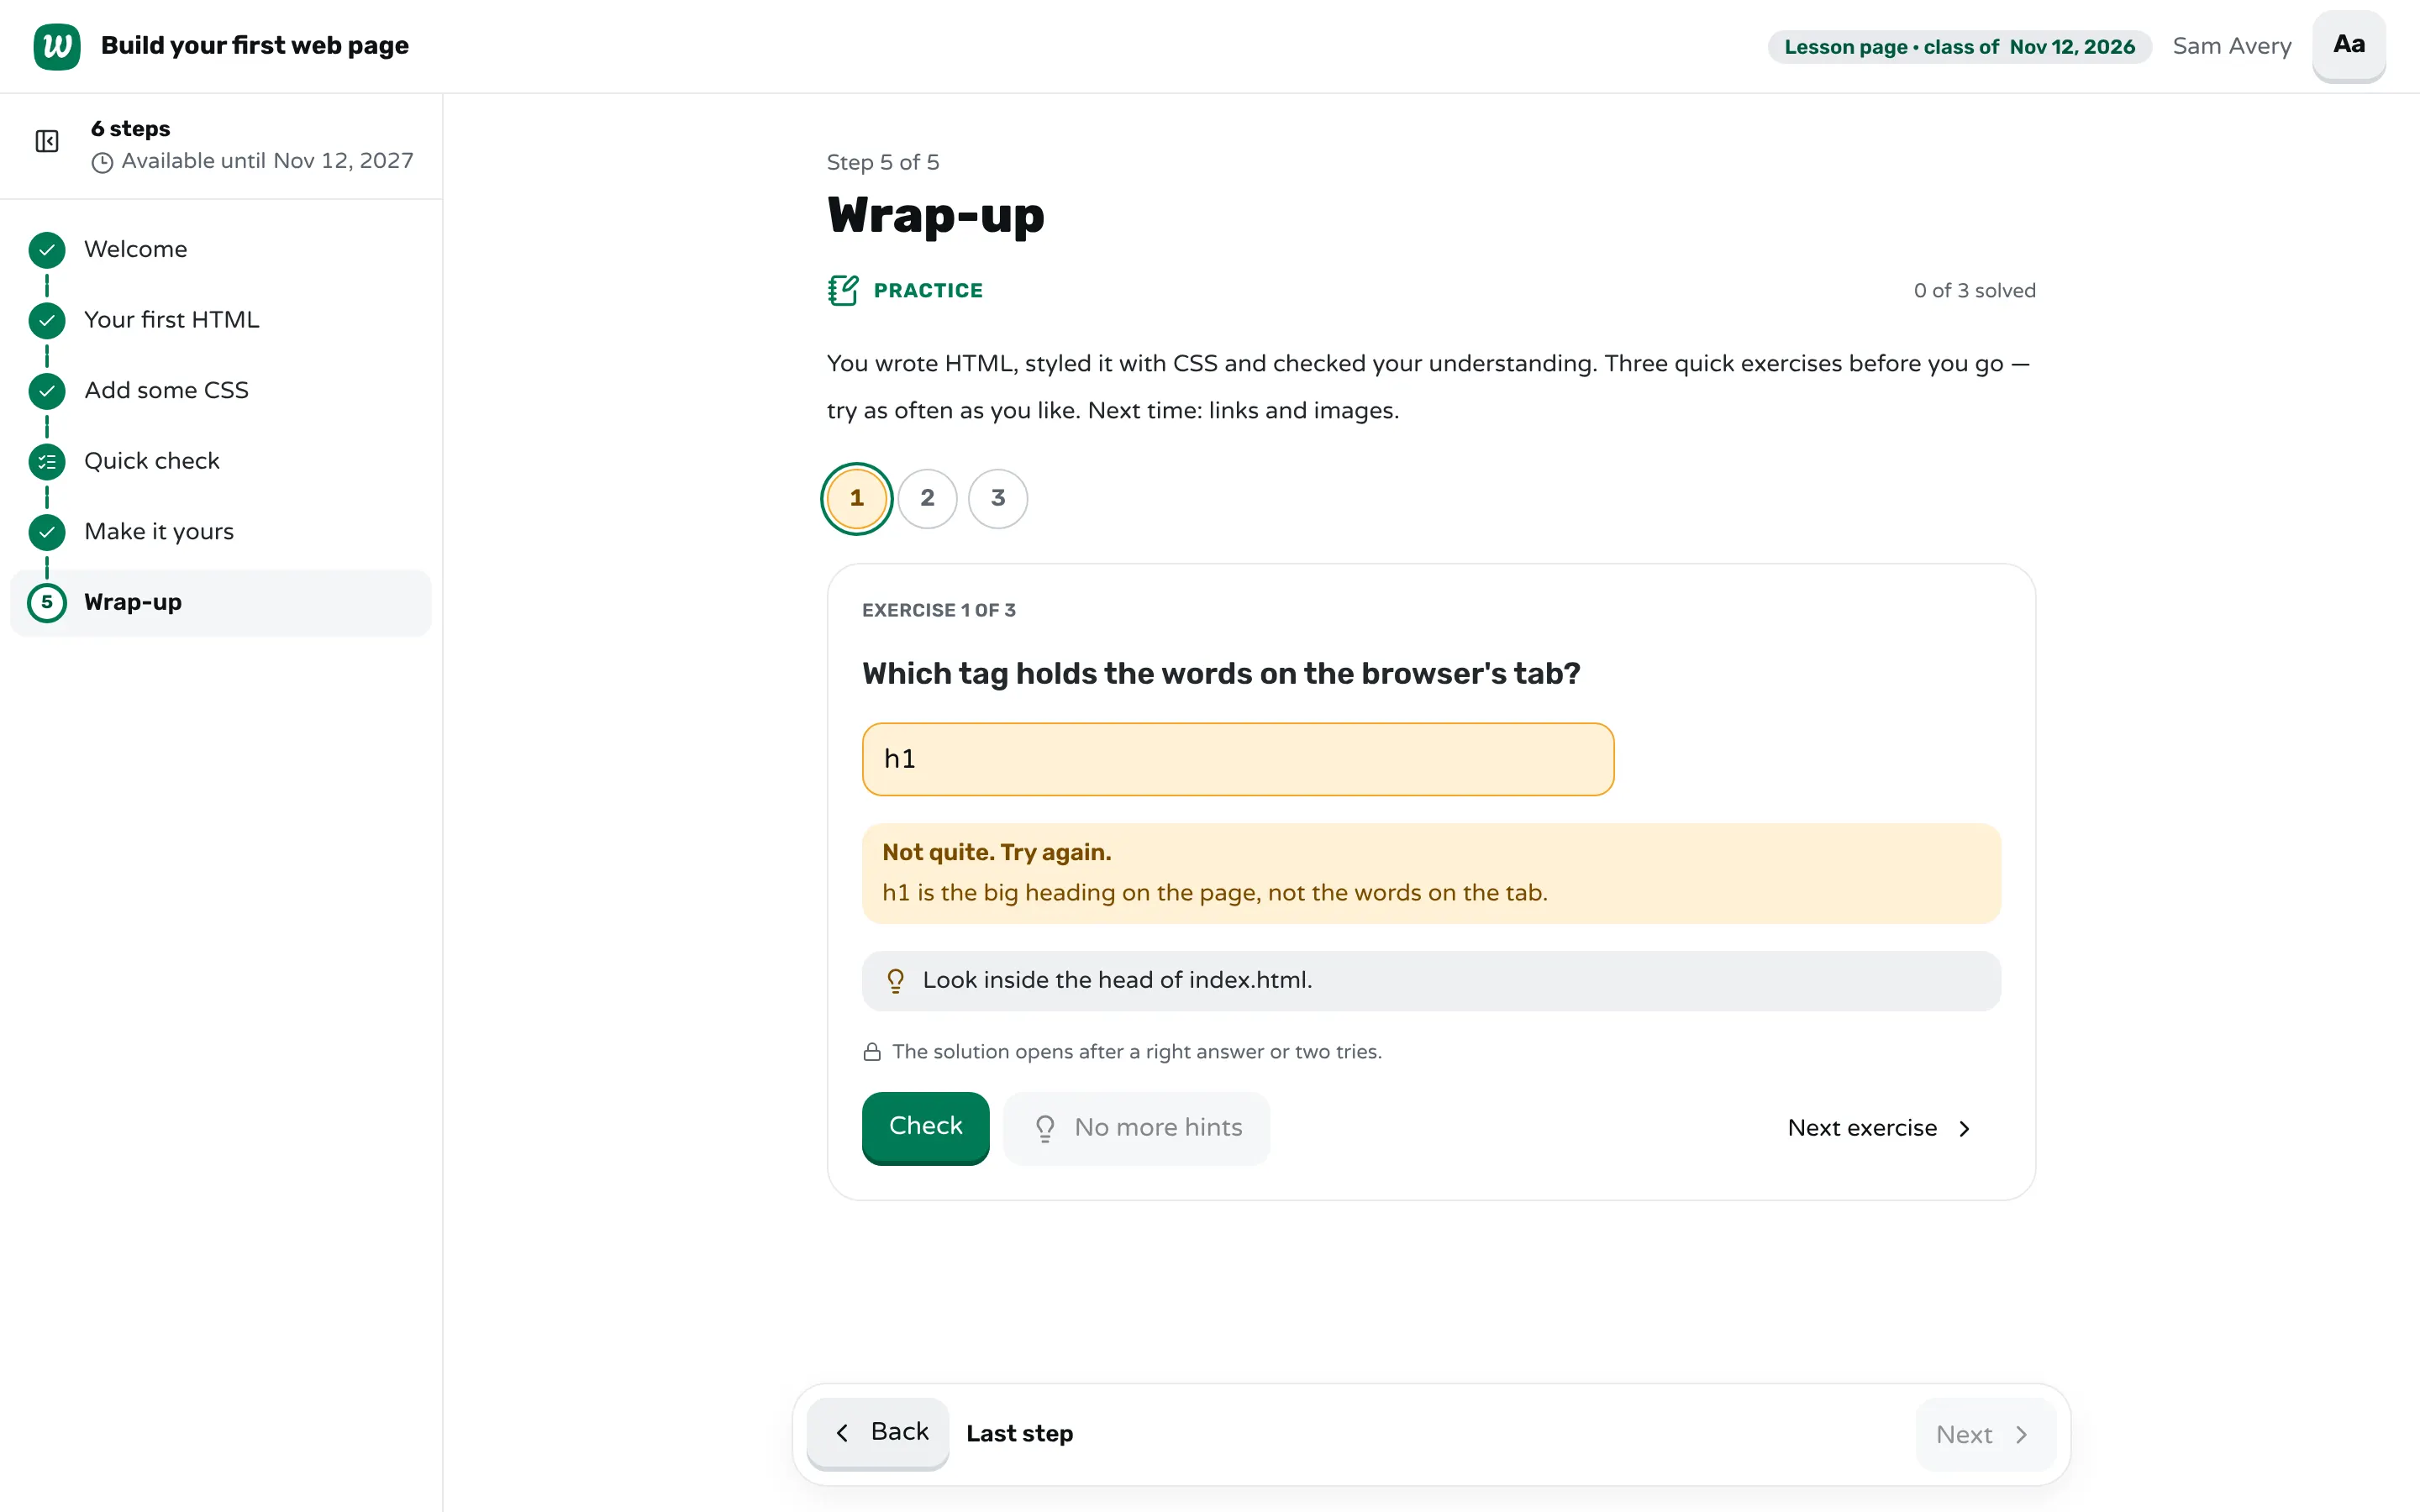
- A message for each likely wrong answer. You know the mistakes students make; you see them every time you teach it. For "Which tag holds the words on the browser's tab?", the answer
h1gets "h1 is the big heading on the page, not the words on the tab." That one line does what you would have said at the student's desk. - Hints in order, from a nudge to almost the answer. "Look inside the head of index.html" comes first; the student asks for it only when they want it.
- The worked solution, after they tried. Keep it out of sight until the student has answered, or the check turns into reading.
Keep the stakes at zero. No grade, no score against other students, as many tries as they like. The point of the check is to find the mistake while the student can still fix it.
Write down where a stuck student goes
Some students will be stuck even with good hints. Decide in advance what they do, and put it in the lesson:
- The fixes for the errors you know. If half your students hit "command not found" on step 2, the step says what to do when that happens, where it happens. Writing lab instructions students can follow shows how.
- A way out of a step. "Can't get it to run? Copy the finished file from here and carry on." A student who skips one step still learns the next five.
- One place to ask. An email address, a course channel or a forum, written at the top and at the end of the lesson. Say how fast someone answers. Students who know a question will be answered ask it; students who don't, leave.
Give it a path and an end
A lesson with no visible end feels longer than it is. On their own, students need to see three things at any moment: where they are, how much is left, and what "finished" means.
- A list of the steps, with the ones they finished marked. Short step titles that say what the step does: "Count the rows", not "Part 3".
- A stopping point students can come back to. Most people take a self-paced lesson in more than one sitting. The lesson should open where they left off.
- A last step that is a task, not a summary. Ask for the main skill again, from scratch, with the answer to check against. A student who solves it knows they can do it. One who doesn't knows which step to open again.
Test it on one person
You can't see the confusion in a lesson you wrote; you know what every step means. Before you share it, give it to one person who matches the students and watch them take it without helping. Note every place they pause, reread or guess. Each pause is a missing sentence, a missing check or a missing hint.
If you can't watch someone, read every step as the student will see it, one at a time, and at each check answer it wrong on purpose. Does the answer back tell you what to fix?
A lesson students take alone in Workshopy
In Workshopy a lesson is one Markdown document, and each # heading starts a step. Students who take a lesson alone see the steps you wrote, without the room.
The checks as a practice step. A step that starts with #[practice] holds exercises: students type an answer, press Check, try again, ask for a hint, and read the solution once they answered right or tried twice. Nothing is graded. You write the feedback in the step:
#[practice] Wrap-up

## Which tag holds the words on the browser's tab?
answer: title
answer: <title>
hint: Look inside the head of index.html.
mistake: h1 → h1 is the big heading on the page, not the words on the tab.
### Solution
`<title>My first page</title>`, inside `<head>`. The browser shows it on the tab.
A #[quiz] step works too: students pick their answers and press Check my answer, and each question says Right! or Not quite. The answers are checked on Workshopy's server, so they are never on the student's page. A Check your work block, where students paste what they got, checks answers only in a live class, so use a practice step for a lesson taken alone.
Sharing it. Publish to library…, in the template editor's menu, puts a copy of the lesson in Workshopy's public library. Anyone with the link can press Start learning, with no account. The steps are listed on the left with what the student finished ticked, Next step moves them on, and Finish lesson ends it. Progress is saved on the device they use, so they can stop and come back to the same step. Your teacher notes are not in the published copy. Editing your template doesn't change what is published until you publish an update.
Know the limits before you choose it. A library lesson is public: anyone can find it. You don't see who took it or how they did, and progress stays on one device, not an account. When you need to see each student's progress, run the lesson as a live class instead, and let students move at their own pace inside it.
After a class. When a live class ends, its students keep a lesson page with the steps as you taught them. With Show quiz answers on, they can do the practice exercises again on it and check each one. Ending a workshop so students remember it covers that page.
Sources
- M. David Merrill, First Principles of Instruction (Educational Technology Research and Development, 2002)
- Valerie J. Shute, Focus on Formative Feedback (Review of Educational Research, 2008)
- Richard E. Clark, Paul A. Kirschner and John Sweller, Putting Students on the Path to Learning: The Case for Fully Guided Instruction (American Educator, 2012)
Frequently asked questions
What is a self-paced lesson?
A lesson students go through on their own, at their own speed, without a teacher in the room. Everything the teacher would say has to be in the lesson: the example, the task, the check, and the help for a student who is stuck.
How long should a self-paced lesson be?
Short enough to finish in one or two sittings, with steps of a few minutes each. Let students see how many steps are left and stop between any two of them.
How do students know they got a step right on their own?
End every step with a result they can check: something to see, a number to compare, or a question that answers back. The best checks say why an answer is wrong, not only that it is.
Should a self-paced lesson show the answers?
Yes, but only after the student tried. Show the worked solution once they answered or made a couple of attempts, and give hints before that.
Can I see how my students did on a self-paced lesson?
It depends on the tool. In Workshopy, a lesson shared from the library shows you no results; to see each student's progress, run the lesson as a live class and let students work at their own pace in it.
Keep reading
How to break a lesson into small steps
List what students must be able to do, give each skill a step with one new idea, and end every step with a result students can check.
8 min read · 2 Nov 2026
Hands-on & coding workshopsHow to write lab instructions students can follow
Write one action per step, say what students should see after each one, and tell them what to do when their screen doesn't match.
8 min read · 31 Oct 2026
Run a live classHow to end a workshop so students remember it
Leave ten minutes: students recall the day without notes, do one last task alone, name their next step, and leave with the lesson.
7 min read · 11 Nov 2026
Ready-made lessons from the library
Intro to Git — Snapshots, Branches & Sharing
A short, hands-on first lesson in Git for complete beginners. Students build the mental model one idea at a time — snapshots, the three areas…
10 steps · Free
Teacher trainingMeet Workshopy — A Live, Interactive Product Tour
A live, interactive product tour of Workshopy for new users. It runs as a real Workshopy session, so the audience experiences the product as participants while…
16 steps · Free
Teacher trainingTrain the Trainer: How to Design a Hands-On Workshop
A train the trainer workshop on designing hands-on sessions: write objectives you can see, plan an hour of talks, exercises and checks, find who's stuck.
11 steps · Free
Learn any of them on your own, free, or copy one and teach it live. Browse the library
See it with a class of 24. No sign-up.
The live demo runs the real product with a simulated class. When you're ready, start free.